
2016 March 12
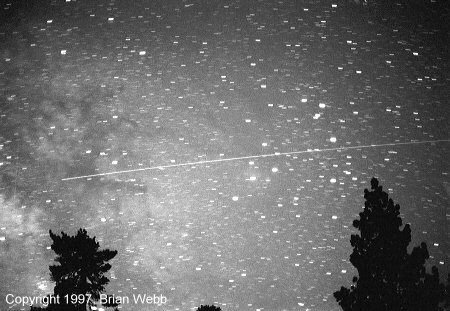
Photo of the Hubble Space Telescope crossing the summer Milky Way. Taken from Mount Pinos, California.
Photographing artificial earth satellites is a challenging facet of astrophotography that requires only simple equipment, a dark sky, a good technique, and a measure of luck.
The suggested equipment is relatively simple and consists of:
The precision compass and clinometer are very useful, but not absolutely necessary.
The following table lists several films for satellite photography. With the exception of TMAX P3200, they are all color print emulsions. There are probably other suitable films, but I've only listed those I've actually used with good results. One film I do not recommended is Konica SR-G3200; it's so grainy the images it produces are unusable. A good rule of thumb for selecting a film is to read the various astronomy magazines and see which films veteran astrophotographers are using.
| ASA | Film | Application |
|---|---|---|
| 100 | Fuji HQ 100, Kodak Gold 100 | Bright satellites |
| 400 | Fuji Super G Plus 400, Fuji Superia 400 | Moderately bright satellites |
| 800 | Fuji Superia 800 | Moderately bright satellites |
| 1600 | Fuji Superia 1600 | Faint satellites |
| 3200 | Kodak TMAX P32002 | Faint satellites |
The choice of photo location is important. A dark site is preferred because it allows you to photograph faint satellites and minimize film fogging from manmade light pollution. Try to avoid locations with air traffic; airplanes have a tendency to fly through your camera's field of view at the worst possible time.
Speaking of light pollution, if you're trying to photograph faint satellites, be sure to avoid natural light pollution as well and limit your photography to times when the Moon is invisible or a thin crescent.
Satellite pass predictions tell you when satellite photo opportunities will occur and where to aim your camera. However, before you can generate predictions, you must first determine the latitude, longitude, and elevation of your photo location as accurately as possible3. Use a topographic map, aeronautical chart, or a web site such as the U.S. Geological Survey's Geographic Names Information System or the National Imagery and Mapping Agency's GEOnet Names Server to find this information.
Once you know the coordinates and elevation of your site, you can generate predictions. There are two ways to do this:
Satellite pass predictions are available from several web sites including Heavens Above, the Earth Satellite Ephemeris Service, and NASA.
There are also several satellite pass prediction programs that you can install on your computer. These include SkyMap, STSPlus, TrakSat, WinSat, etc. For a complete listing of software, go to Satellite Related Software.
Regardless of the method you use, be sure the predictions are based on recent orbital data. This is especially true for satellites in low orbits (below 400 km) such as the International Space Station. The lower the orbit, the faster the actual pass parameters (times, elevation, azimuth, etc.) will vary from the predictions.
If you are generating predictions from a web site, do this no more than 6-hours before the start of the photo shoot. If you are generating the predictions on your computer, go on the Internet 6-hours or less before your photo shoot, download the latest orbital elements, and generate the predictions.
Satellite pass predictions come in two basic forms: tabular and graphic. Tabular data lists various pass parameters (date, time, azimuth, elevation, range, etc.) in a table. This information is very useful for aiming a camera using a precision compass and clinometer.
Graphic pass data shows the trace of the spacecraft across the sky with an azimuth and altitude grid, background stars, or both. Plots with background stars are especially useful because they allow you to aim your camera without a compass or clinometer by using stars as landmarks.
Generate the predictions and printout the results. Examine the information for each satellite. For evening passes, eliminate objects in polar orbit if they will pass more than 20 degrees west of the meridian. For morning passes, eliminate polar orbiting objects if they will pass more than 20 degrees east of the meridian 4.
Unless you specifically intend to photograph faint objects from a dark site, examine the remaining records again. Cross out those belonging to medium- to small-sized objects. The preferred targets for beginners or those photographing from less than dark sites are Russian Cosmos and Intercosmos satellites and the spent upper stages of rockets from all nations. Russian space hardware is much larger than that of other nations, and thus easier to see. Make a list of the passes in time order with the time, azimuth, and elevation.
The best passes are those that occur in the evening between the end of astronomical twilight and 45 minutes later and in the morning from 45 minutes before the start of astronomical twilight and when it begins. At dark sites the sky will be as dark as it will get and most satellites will be illuminated sunlight for at least part of the pass. You can generate a table of astronomical twilight data for an entire year by going to the U.S. Naval Observatory web site.
Before going to your site, set your watch to an accurate time standard. Various governments provide time signals via radio and telephone. An excellent source of accurate time is a GPS receiver. But be aware the indicated time could be incorrect if the receiver hasn't recently locked-on to GPS satellites and updated its clock.
Several minutes before a predicted pass, use the compass and clinometer or graphic to aim the camera at a point in the sky through which the satellite will pass. Open the camera lens' iris according to the film speed and sky background in the following table and set the shutter for a time exposure. When referring to the table, keep in mind that the times listed are the theoreticial maximum exposure.
| Sky Background | ASA 100 | ASA 400 | ASA 800 | ASA 1600 | ASA 3200 |
|---|---|---|---|---|---|
| Moderate light pollution. Brightest parts of the Summer Milky Way barely visible | 60 sec. f/2.8 |
60 sec. f/5.6 |
60 sec. f/8 |
60 sec. f/11 |
60 sec. f/16 |
| Low light pollution. Summer Milky Way clearly visible | 2880 sec. f/2.8 |
720 sec. f/2.8 |
360 sec. f/2.8 |
180 sec. f/2.8 |
90 sec. f/2.8 |
| Very low light pollution. Summer Milky Way very prominent. Difficult to see surroundings | 3840 sec. f/2.8 |
960 sec. f/2.8 |
480 sec. f/2.8 |
240 sec. f/2.8 |
120 sec. f/2.8 |
Begin looking for the satellite a couple of minutes before the predicted pass. This is especially true if the spacecraft is a low orbiter because they often appear early. Also, be prepared to quickly open your camera's shutter.
If you are photographing medium and high-altitude satellites with a 50mm lens, open the shutter 30-seconds before the satellite's predicted passage through the center of the field of view. You can then quickly look up and see if the satellite is visible5. After 60 seconds, close the shutter.
Luck is an important factor in successful satellite photography. When attempting to photograph fainter objects, it usually takes about ten exposures to get one good photo.
Notes
Copyright © 2001-2016, Brian Webb. All rights reserved.